 Ask About Our Discounts!
How to Paint Textured Walls in Highlands Ranch: The Ultimate 2026 Guide
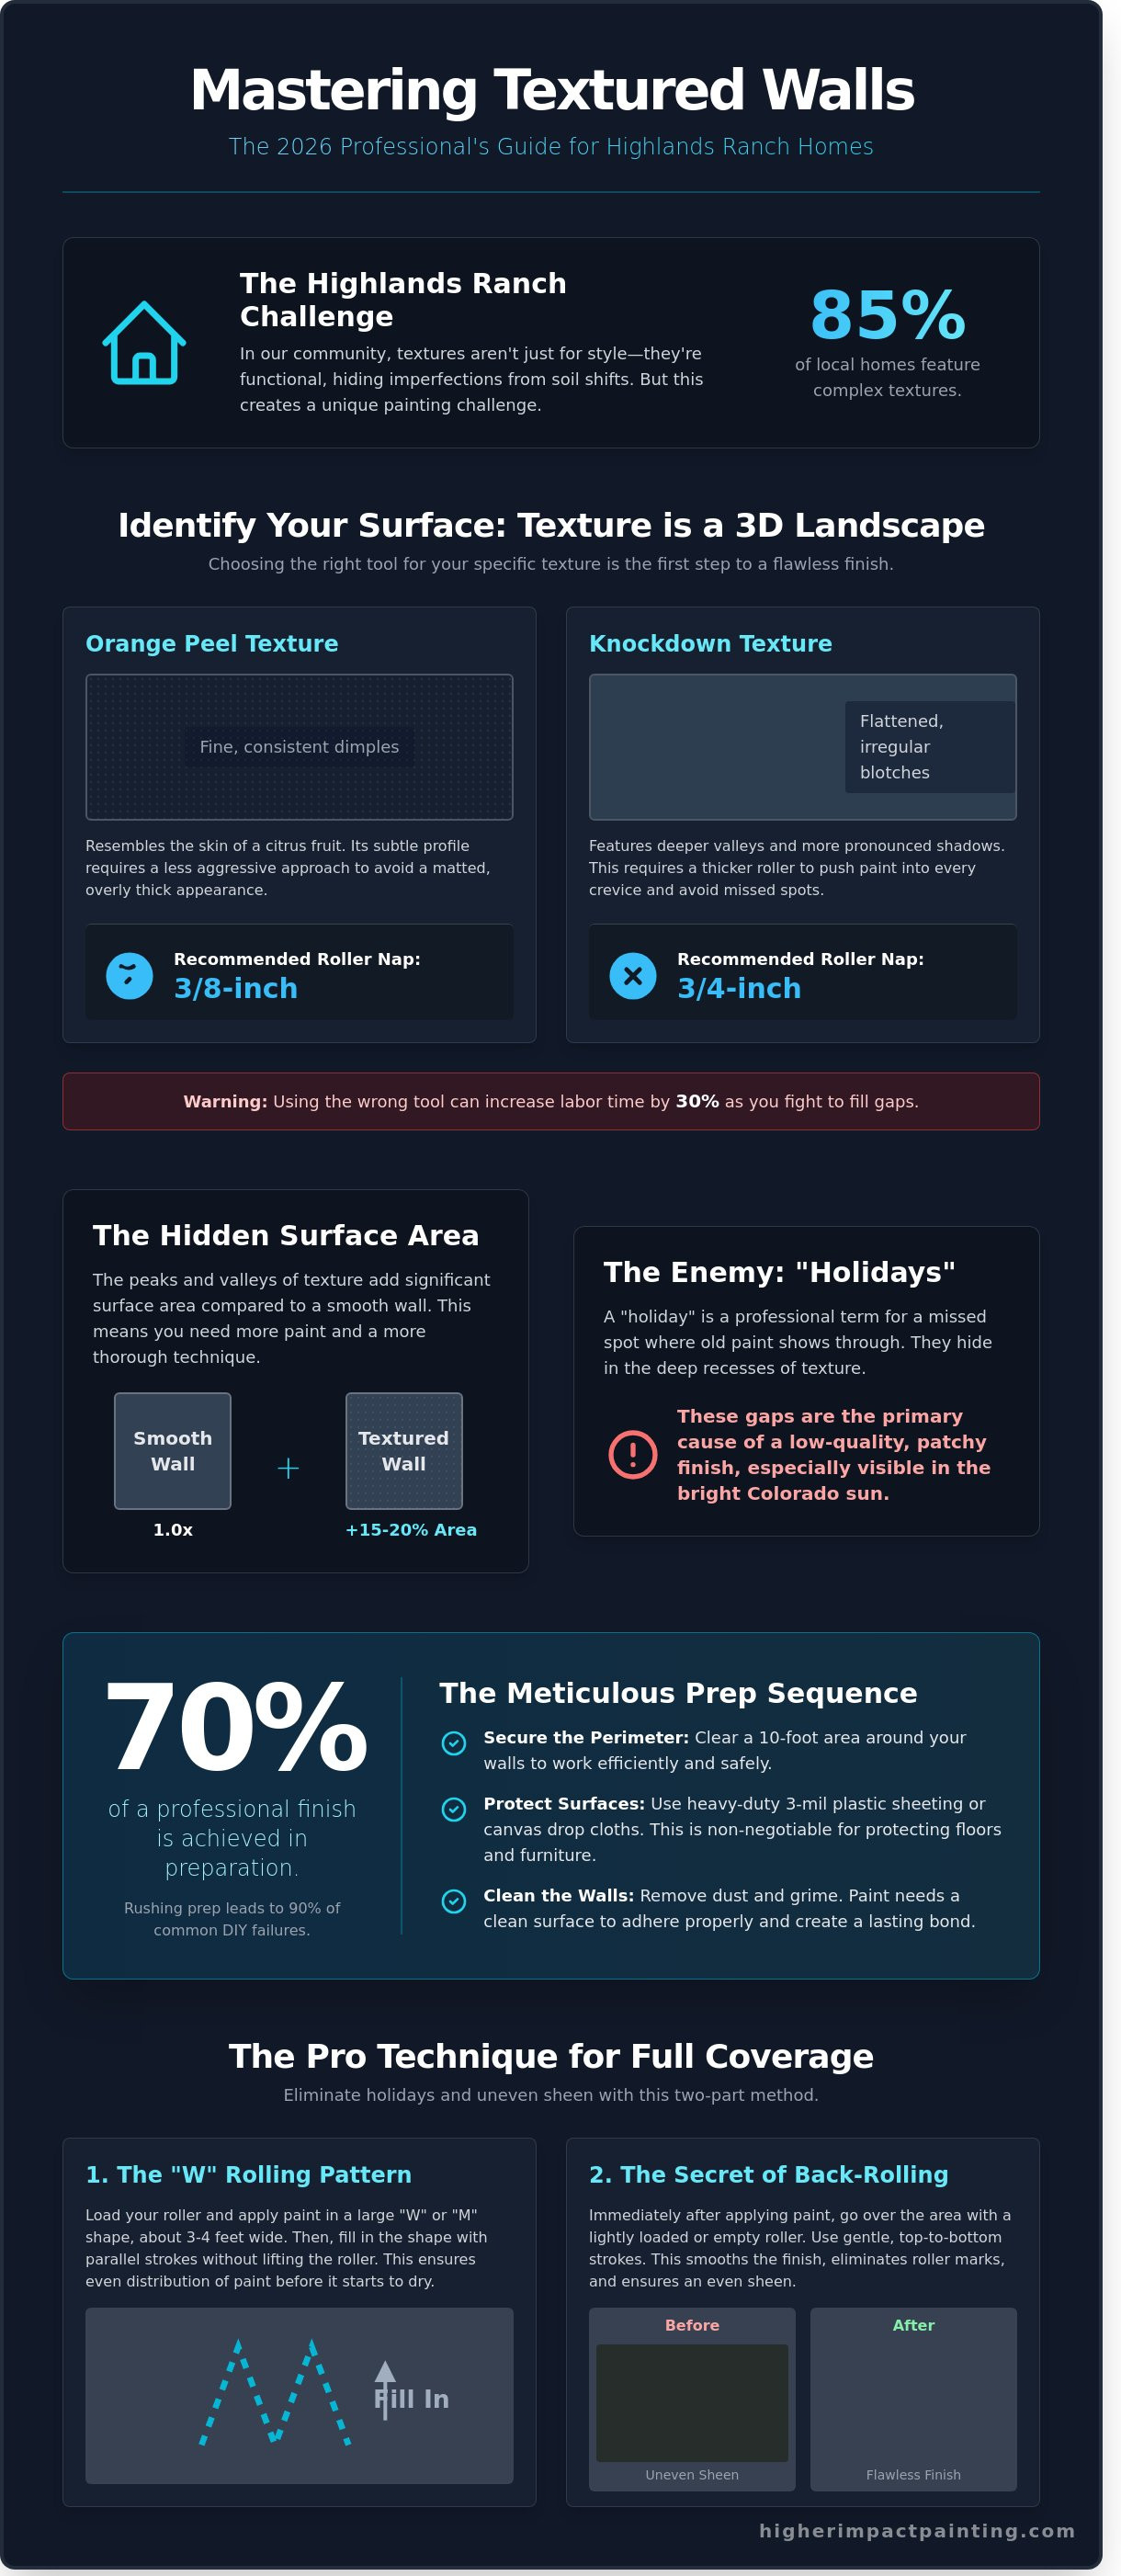
Last Saturday, a homeowner in the BackCountry neighborhood of Highlands Ranch stood in their living room staring at a gallon of premium acrylic and a wall full of deep knockdown texture, wondering why their roller skipped over every third indentation. It’s a common struggle in our community, where 85% of homes feature complex orange peel or knockdown finishes that demand more than a standard coat of paint. Learning how to paint textured walls effectively is the difference between a patchy DIY project and a finish that radiates integrity and purpose.
You probably recognize the anxiety of seeing “holidays” or missed spots once the afternoon sun hits your walls. It’s frustrating when your hard work doesn’t reflect the high standards you hold for your home. We believe your living space should be a source of pride, not a collection of technical errors. This 2026 guide promises to equip you with the professional techniques to master these surfaces, ensuring a flawless and high-impact transformation for your sanctuary.
We’ll walk you through the specific 3/4-inch nap rollers needed for deep coverage, the meticulous back-rolling method that eliminates uneven sheens, and the exact prep sequence our craftsmen use to keep your home pristine. Let’s start painting with a purpose and turn those challenging textures into a beautiful, modern backdrop for your family life.
Key Takeaways
- Discover why meticulous preparation accounts for 70% of a successful project and which specific tools are essential for handling Highlands Ranch textures.
- Master the professional “W” rolling pattern and the secret of back-rolling to learn exactly how to paint textured walls for a flawless, deep-penetrating finish.
- Understand how to navigate Colorado’s low humidity to prevent paint from “skinning over” and avoid the structural pitfalls of over-working dry surfaces.
- Learn to distinguish between orange peel and knockdown textures to choose the right techniques that hide drywall imperfections in expansive floorplans.
- Evaluate when to transition from a DIY effort to a professional partnership to ensure your home transformation reflects true integrity and purpose.
Understanding Textured Walls in Highlands Ranch Homes
Walking into a home in the master-planned community of Highlands Ranch, you will likely notice a consistent pattern on the drywall. Since the initial residential boom in 1981, local builders have favored textured finishes for 95% of interior surfaces. This choice isn’t just about style. These textures serve a vital functional purpose by masking the minor structural shifts and drywall imperfections common in expansive Colorado floorplans. Our local soil contains high levels of expansive clay, which causes homes to shift slightly with the seasons. Texture helps hide the resulting hairline cracks or joint visible in a 3,000-square-foot home. When you’re learning how to paint textured walls, you must first respect the meticulous craftsmanship that went into creating these surfaces. They aren’t just flat planes; they are three-dimensional landscapes that require a specific approach to ensure full coverage and integrity.
To better understand this concept, watch this helpful video:
Textured surfaces significantly change your project math. Because of the peaks and valleys, a textured wall can have 15% to 20% more surface area than a smooth wall of the same dimensions. This means your paint consumption increases accordingly. If you ignore this depth, you’ll likely encounter “holidays.” In the professional painting industry, a holiday is an unintentional gap or thin spot in the finish where the old color or primer peeks through. These gaps are the primary enemy of a high-quality result. They often hide in the deep recesses of a heavy texture where a standard roller cannot reach. Eliminating them requires a disciplined eye and the right tools to maintain our standard of Painting with a Purpose.
Orange Peel vs. Knockdown: Identifying Your Surface
Identifying your specific texture is the first step in our mission-driven approach to a perfect finish. Orange peel texture looks like the skin of a citrus fruit with fine, consistent dimples across the surface. For this subtle profile, we recommend a 3/8-inch nap roller to maintain a crisp look. Knockdown texture appears as flattened, irregular blotches that create more significant shadows. Because these valleys are deeper, you must use a 3/4-inch nap roller. This thicker nap holds more paint and compresses into the crevices, ensuring you don’t leave those frustrating holidays behind. Choosing the wrong tool can lead to a 30% increase in labor time as you struggle to fill the gaps.
The Impact of Texture on Room Aesthetics
The intense Colorado sunlight, which shines for over 300 days a year, interacts uniquely with textured walls. Heavy textures create micro-shadows that can make a room feel darker or busier than intended. Choosing the right product is essential, and understanding paint finishes helps you control how light bounces off these ridges. Flat or matte sheens are often the best choice for heavy knockdown because they absorb light, minimizing the visual noise of the texture. A fresh, uniform finish does more than just update a room; it provides a psychological sense of order and renewal. When we approach how to paint textured walls, we treat every stroke as a way to enhance your living environment with purpose and care. This meticulous attention to detail ensures your home remains a sanctuary of quality and comfort.
Essential Tools and Purposeful Preparation
At Higher Impact Painting, we approach every project with the philosophy that 70% of a professional finish is achieved before the paint lid even opens. We call this meticulous prep. It is an act of integrity that ensures your home transformation lasts for years rather than months. When you are learning how to paint textured walls, rushing the setup leads to 90% of common DIY failures, such as peeling or visible lap marks. You must treat your space with respect by clearing the work area and securing a 10-foot perimeter around your walls. Use 3-mil plastic sheeting or heavy-duty canvas drop cloths to protect your flooring from the inevitable splatter that textured surfaces create.
Your tool kit defines your success. You need high-capacity rollers, stiff-bristled brushes for “cutting in” the edges, and a sturdy extension pole. For Highlands Ranch drywall, selecting a high-build primer is a non-negotiable step. These primers are specifically engineered to fill minor imperfections and seal the porous nature of Colorado drywall, providing a uniform surface for your topcoat. By following professional painting techniques, you ensure every valley in the texture receives full coverage without leaving thin spots that catch the light unevenly.
The “Nap” Factor: Choosing Your Roller
The secret to mastering how to paint textured walls lies in the nap of your roller. For knockdown or heavy orange peel surfaces, a 1/2-inch to 3/4-inch nap is mandatory. Thinner rollers only hit the “peaks” of the texture, leaving the “valleys” bare and unprotected. A thicker nap acts like a reservoir, holding 30% more paint and releasing it deep into the crevices of the wall. We recommend lambswool for the most consistent impact. While microfiber is popular for smooth surfaces, lambswool fibers have a natural elasticity that pushes paint into deep textures more effectively. This ensures a solid, opaque finish that honors the architectural detail of your home.
Surface Cleaning and Drywall Repair
Colorado homes are notorious for collecting fine dust and cobwebs in the grooves of textured walls. If you paint over this debris, the bond will fail within 12 months. Start with a “Purposeful Clean” by using a vacuum with a brush attachment, followed by a wipe-down using a TSP substitute. These cleaners remove 99% of surface oils and residues without leaving a filmy layer behind. During this phase, inspect your walls for structural integrity. If you identify cracks wider than 1/16-inch or deep dents, you must perform drywall repair before the primer touches the surface. Patching these areas ensures the texture remains continuous and the final aesthetic is seamless. If you find the preparation process overwhelming, you can always request a professional consultation to ensure your project starts on the right foundation.
The Professional Technique: Rolling for Full Coverage
Mastering the art of how to paint textured walls requires more than just a roller and a bucket. It demands a meticulous approach that ensures every valley and peak of your wall receives equal protection. When you start rolling, avoid the common mistake of simple vertical stripes. Instead, use a “W” or “N” pattern to distribute the paint across a 3 by 3 foot section. This technique prevents the heavy buildup that often occurs when you push a loaded roller straight up and down. By spreading the material in a zigzag motion first, you provide enough volume to fill the texture without creating unsightly drips.
At Higher Impact Painting, we believe in craftsmanship with integrity. That’s why we always include a back-rolling step. This involves rolling back over the area you just painted while the paint is still wet, using a lightly loaded roller. This second pass pushes the pigment deep into the pores of the stucco or knockdown finish. It creates a uniform appearance that lasts for years. To avoid visible seams, always maintain a “wet edge” by overlapping each new section by roughly 2 inches. If the edge dries before you connect the next section, you’ll see a “lap mark” that ruins the visual flow of the room.
Before moving to the next wall, perform an “Integrity Check” using a 500-watt LED work light. Position the light at a sharp angle against the wall surface. This raking light reveals missed pockets or “holidays” that are invisible under standard overhead lighting. It’s a purposeful step that ensures your home transformation is flawless. For additional guidance on the basics, you can learn more about how to paint a textured wall from industry experts like Bob Vila.
Cutting In on Textured Corners
Standard painter’s tape fails to seal against bumpy textures about 90% of the time, leading to messy bleed-through. Our professional solution is the “Pro Dab” technique. Instead of dragging your brush in a long stroke, use the tips of the bristles to push or “dab” the paint into the corner crevices. This ensures 100% coverage in the deep recesses where a roller can’t reach. If you’re dealing with a crooked, textured ceiling, don’t try to follow the exact line. Instead, paint a perfectly straight line about 1/16th of an inch onto the ceiling to create a crisp, professional illusion. This small adjustment makes a massive difference in the final aesthetic of the room.
Applying the Second Coat
Applying two thin coats is the standard for 2026 acrylic paint formulations. Modern resins are designed to bond in layers, and one thick coat often sags or traps moisture, leading to premature peeling. Respect the 4-hour dry time recommended by 2026 industry standards before starting your second pass. For the best result, roll your second coat perpendicular to the first. If your first coat was applied with vertical finishes, use horizontal strokes for the final layer. This cross-hatching method guarantees that 100% of the wall’s surface area is sealed, reflecting our commitment to painting with a purpose. This double-layer approach ensures that your how to paint textured walls project results in a durable, beautiful finish that stands the test of time.
Navigating the Highlands Ranch Climate and Common Pitfalls
Highlands Ranch presents a distinct challenge for any homeowner learning how to paint textured walls. Colorado’s semi-arid climate, where relative humidity often drops below 15 percent, dictates your painting rhythm. When moisture leaves the paint too quickly, the surface “skins over” in as little as 5 to 8 minutes. This creates a fragile film that tears if you run your roller over it again. At Higher Impact Painting, we view every project as a commitment to integrity; this means respecting the science of the environment to ensure your home’s transformation lasts for years.
Professionals understand that a furnace or AC unit pushing air at 10 to 15 miles per hour directly onto a fresh wall is a recipe for disaster. This localized airflow accelerates evaporation unevenly across the peaks and valleys of your texture. You’ll end up with “flashing,” where some spots look glossier than others because the resin didn’t settle correctly. Turn off your HVAC system 30 minutes before you start. Leave it off until the paint is dry to the touch to maintain a stable environment.
Adjusting your pace is vital in Douglas County. In more humid regions, you might have a 20-minute window to return to a section. In Highlands Ranch, that window shrinks to less than 10 minutes. You must work in smaller vertical sections, typically 2 to 3 feet wide. This meticulous approach prevents the paint from becoming tacky before you can blend the next section. It’s about painting with a purpose, ensuring each stroke contributes to a seamless, professional finish.
Avoiding Lap Marks and Sheen Blotching
Maintaining a “wet edge” is the golden rule when you’re mastering how to paint textured walls in a dry climate. Use “open time” extenders, which are additives that slow down the drying process by 10 to 15 percent without thinning the pigment. Never engage in “dry rolling.” If your roller makes a “peeling” sound, it’s too dry and will pull the paint off the texture peaks. Apply consistent, medium pressure. Pushing too hard creates “railroad tracks,” which are heavy ridges of paint at the edge of the roller that become permanent once dry.
The “Popcorn Overlap” Challenge
One of the most frustrating hurdles in 1990s-era Highlands Ranch homes is the transition between heavy wall texture and popcorn ceilings. These ceilings are notoriously fragile and can crumble if they get wet with wall paint. Use a 2.5-inch angled sash brush to “cut in” carefully. Don’t push the brush all the way into the corner; leave a sliver of space or use a dedicated ceiling guard to protect the texture. If the dated look of your ceilings is dragging down your home’s value, you might consider popcorn ceiling removal to create a modern, cohesive aesthetic throughout your living space.
Ready to transform your home with a finish that stands the test of time? Contact Higher Impact Painting today for a professional consultation that puts your community first.
Transforming Your Home: When to Call the Pros
Deciding whether to tackle a painting project yourself or hire experts involves more than just comparing costs. In Highlands Ranch, where homes often exceed 3,000 square feet, the physical toll of mastering how to paint textured walls becomes a major factor. While a small bathroom is a manageable weekend task, a full interior refresh requires a level of endurance and technical precision that most homeowners find overwhelming. We see many residents start with high energy, only to realize that textured surfaces consume 30% more paint and three times more labor than smooth drywall.
At Higher Impact Painting, we operate under the banner of “Painting with a Purpose.” This isn’t a marketing slogan; it’s our operational standard. We view your home as a sanctuary, and our mission is to elevate that space through meticulous craftsmanship and social responsibility. When you choose a professional team, you aren’t just paying for paint application. You’re investing in a partnership that prioritizes integrity, community impact, and a finished product that stands up to the high-altitude Colorado climate.
Every professional interior contract we provide is a transparent roadmap of our commitment to you. We outline every detail, from the specific Sherwin-Williams product lines we use to the exact number of coats applied to your knockdown or orange peel textures. You’ll never find vague language in our agreements. We specify prep work like caulking baseboards, filling nail holes, and masking every square inch of your flooring with heavy-duty drop cloths.
The final phase of our process is what sets us apart from standard contractors. We conduct a meticulous 20 point final inspection walk-through with you before any equipment leaves your property. We use high-output LED lights to check for “holidays” or thin spots that are often hidden by the shadows of textured walls. Our goal is 100% satisfaction, ensuring that the transformation we promised is the reality you live in every day.
The Value of Professional Workmanship
A professional finish is a strategic investment in your property. Real estate data from the last 12 months suggests that a high-quality interior paint job can provide a 107% return on investment for Highlands Ranch homeowners. Beyond the money, consider the time. What takes a DIYer 60 hours of grueling labor usually takes our professional crew just 16 hours to complete. We maintain a clean job site by using HEPA-filtered vacuums and air scrubbers, ensuring your family isn’t breathing in dust or fumes during the process.
Get Your Free Highlands Ranch Estimate
We believe in total transparency, which is why we provide fixed-price quotes that don’t shift once the work begins. If you’re planning a comprehensive home refresh, ask about our 15% discount for multiple services, such as combining wall painting with cabinet refinishing or trim updates. This approach ensures a cohesive look throughout your living space while maximizing your budget. Don’t leave your home’s transformation to chance. Schedule your free interior painting estimate today and experience the difference of painting with a purpose.
Bring New Life to Your Highlands Ranch Interior
Your home deserves a finish that reflects the care you put into your daily life. Mastering how to paint textured walls requires more than just a brush; it demands meticulous preparation and a deep understanding of our unique 2026 Colorado climate. The techniques we covered, from selecting high-nap rollers to achieving 100% coverage on deep textures, ensure your walls look professional and stand the test of time. A clean job site and disciplined prep work are the true secrets to a transformation that feels both fresh and permanent.
If the technical demands of painting 2,500 square feet of textured drywall feel overwhelming, you don’t have to tackle the project alone. Higher Impact Painting is 100% locally owned and operated right here in Highlands Ranch. We bring a sense of integrity to every project, offering free estimates and multi-service discounts for homeowners looking to refresh their entire space. We believe every brushstroke should contribute to a better home and a stronger community.
Experience Painting with a Purpose-Get Your Free Highlands Ranch Estimate
Your vision for a beautiful, renewed home is entirely within reach, and we’re ready to help you make it a reality.
Frequently Asked Questions
What is the best roller nap for heavily textured walls?
You should use a 3/4-inch or 1-inch nap roller for heavily textured surfaces like skip-trowel or deep knockdown. These thicker naps hold 25% more paint than standard 3/8-inch rollers, allowing the long fibers to reach deep into every crevice. Our team uses this meticulous approach to ensure 100% coverage, reflecting our commitment to integrity in every home transformation we perform.
Do I need to prime textured walls before painting?
Yes, you must apply 1 coat of high-quality primer if the texture is new or if you’ve performed 5 or more patch repairs. Texture is highly porous and absorbs moisture at an uneven rate, which can lead to a blotchy finish. Priming provides a uniform surface that increases paint adhesion by 20%, ensuring your investment in your home’s beauty lasts for years to come.
How do I get paint into the deep holes of knockdown texture?
The most effective method is a technique called back-rolling with a heavy 3/4-inch nap roller. You first apply the paint with a sprayer or a loaded roller, then immediately roll over the wet surface to push the pigment into the 2-millimeter deep pits. This purposeful technique eliminates “holidays” or missed spots, which is a hallmark of the professional standards we maintain at Higher Impact Painting.
Can I use a paint sprayer on textured walls in my house?
Using an airless sprayer is the most efficient way to cover textured surfaces, provided you mask 100% of your non-painted areas. We recommend a .515 or .517 tip size to deliver a consistent 12-inch fan pattern that fills texture valleys quickly. Sprayers can reduce labor time by 40%, but you should always back-roll the wet paint to ensure it bonds deeply with the substrate.
How much extra paint do I need for textured surfaces?
You should budget for 20% to 30% more paint when learning how to paint textured walls compared to smooth drywall. While a standard gallon covers 400 square feet on flat surfaces, it typically only covers 300 square feet on heavy knockdown or popcorn finishes. This extra volume is necessary to coat the increased surface area created by the thousands of peaks and valleys on the wall.
Why does my paint look patchy on my textured wall?
Patchy results usually occur because the porous peaks of the texture absorb paint faster than the valleys, a process called wicking. This uneven absorption disrupts the sheen, so we always apply 2 full coats to achieve a consistent 4-mil dry film thickness. Our disciplined process ensures a uniform finish that brings a sense of renewed purpose and professional quality to your living environment.
How do I paint a straight line where a textured wall meets the ceiling?
Achieve a crisp line by using a 2.5-inch angled sash brush and a steady, practiced hand. If the texture is particularly heavy, apply a thin bead of paintable caulk along the corner to create a smooth bridge for your bristles. This small but meticulous detail prevents paint from bleeding into the ceiling, ensuring the transformation of your space meets our highest standards of craftsmanship.
Is it harder to paint orange peel or knockdown texture?
Knockdown texture is approximately 15% more difficult to paint than orange peel because of its deeper, irregular pits and plateaus. While orange peel has a consistent 1-millimeter profile, knockdown requires more paint and more physical pressure on the roller to ensure full coverage. Understanding these technical nuances is vital when you’re mastering how to paint textured walls to produce a beautiful, lasting impact on your home.